String Art DIY
 Learn by doing is the 4-H Way. Every experience is grasped as a learning opportunity. Spend this winter break creating an art piece to decorate your home.
Here is how I tackled the String Art Do-It-Yourself project. It was easier than I expected and I have now done this project with a few middle school groups as well.
Materials you will need:
- A piece of wood cut to your size preference.
- Stain of any color. (See tips)
- String: Crochet Thread size 10
- Nails: linoleum nails
- Small Hammer (See tips)
- Pattern/Image
- Saw-Tooth Picture Hanger (Optional)
- Sandpaper (Optional)
- Gloves (Optional)
- Glue Gun (Optional)
Steps:
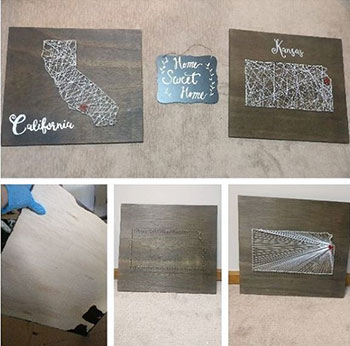
- Cut and use sandpaper to smooth out the edges.
- Wear gloves and stain the wood at an area with good ventilation. Let it dry.
- Tape the pattern on the board. Hammer in the nails along the pattern. The nails should be about ½” apart from each other.
- Remove the pattern carefully from the board once the nails are all hammered in. Be patient and try not to leave pieces of paper stuck to the board.
- Tie the string to a nail and secure it with a knot. Move to the next nail, wrap it around, and continue. I like to outline image before I string the inside. This takes patience!
- Stringing the inside. There are different ways. If you look at the picture, you can see how in one piece, I radiated away from KC and in the other, I threaded randomly. This is just personal preference.
- Tie a knot to finish. I like to use a hot glue gun and glue down the dangling string.
- Hammer in the saw-tooth picture hanger on the back to hang your art piece.
Tips and Suggestions:
- The stain can be any color but if you are using a light colored string, use a dark stain. If you are using a dark colored string, use a light stain.
- You can do this without pliers but holding the nail with the pliers helped a lot!
- Search for patterns/images with few details. I always searched for “clip art” of images I wanted. I suggest printing two copies. One copy to tape on the board and another for reference as you string the art piece.
- You don’t necessarily need to use a small hammer but it tends to work better because the nails are pretty small and the corners can get cramped.
What your child will learn
- Be a smart consumer. Engage your 4-H’er with questions. - What do we buy? What thickness board do we want to use? What are the benefits of a thicker board vs a thinner board? Why did we use this type of nail? Could we have used another type? What difference will might it have on the final product?
- Improve their motor skills. It might be the first time your 4-H’er is hammering a nail. Practice makes perfect is true. Is it better to use smaller movements or larger movements?
- It’s okay to not be perfect. When I did this with a group of middle schoolers, they were so worried about the nails being perfectly spaced and perfectly oriented. It's good to have high expectations but there’s value in realizing that not everything has to be perfect.
- Patience! The string can come unraveled. The 4-H’er needs to take their time and be patient.
Try this project with your child and share pictures with us on social media #jocoks4h.